Thursday, October 31, 2019

Dealing with epic resin failures

We're back from vacation and both Jeff & I are suffering some back issues brought on by the furniture in the condo we were at.  So my attempt to pour resin and do all the small pieces I had set up was pushing it a bit.  And my back got worse between the first pour and the second pour so I rushed the process to finish before I had to quit due to pain.  This was the first lesson of this epic failure in my resin adventures:  Don't work while in pain, especially if the work requires using the part of the body that's in pain.


Here's all but 2 of the pieces I made.  The other two got trashed because really they were total failures.  All of the above pieces have flaws and only two are fixable.  So this has turned out to be an epic learning experience.  What did I learn?

1) don't work while in pain.  see above.
2)  prewarm resin for both pours, not just the first. 3 pieces ended up with massive bubbles due to not prewarming the resin on the second pour. The leftmost piece above was perfect except for the tiny cluster of bubbles along one edge.  And check for bubbles every pour because they are fixable if caught soon enough.
3)  Do fewer pieces at one time.  One piece, the six pointed star, failed because the box that is supposed to keep the pieces from getting dust in the resin while curing got put directly on the edge of the piece rather than next to it which left some of the paper from the box on 2 of the points. Less crowding of the space by doing fewer pieces would have saved this one.
4)  No plopping the pictures down on the resin.  Lay them out from one edge toward the other so as not to trap air under them.  The large oval and the pink square both had this as the only flaw.  (I'm particularly unhappy about these failures as I already learned this lesson from marbling.  Bad Liz!  No keto cookies!)
5)  Elevate the items so I can better see the doming when I'm doing the second pour.  I overpoured several pieces, particularly the 2 I tossed.  While some of this can be trimmed and filed off, it's still something that's easier to prevent than to fix.
6) Keep the temp up in the correct zone for the entire curing time.  Two of the pieces have soft spots on the edges because of failure to cure correctly.  (This also occurs if  the resin mixing is not done properly but I don't believe that was the cause since both pieces were on the same side of the work table.  I have a small heater on order to fix this.)

What good things came out of this work?  I succeeded in using the 2 molds I made and they worked fine.  I mixed colors, tested an idea about marbling, and learned some things about using the mandala transparencies with colors behind them.  While I was incredibly frustrated right after unmolding things, I feel I learned a lot from the work.  And James Clear's email today reminded me of some important things to keep in mind.  His ideas today -

"If you haven’t started, then taking action is more important than finding a better strategy.

If you’re already taking action, then ensuring you’re working on the right thing is more important than working harder."

This is causing me to think about which part of the resin work is the right thing for me to be working on.  If only life's lessons weren't so rough sometimes. 


Monday, October 21, 2019

Ocean Shores vacation to refresh my soul

One of my theories about people is that we each connect to the universe spiritually through different landscapes.  I'm a water girl; moving water is better than still but I'll take a lake if there's no ocean shore or babbling brook.  I suspect this connection explains the popularity of landscapes for art but that's a whole other discussion about art & emotion.
Being a water person, I like to vacation at the beach.  Just standing on the sand, breathing in the sea air, watching the waves, evokes a calm that nurtures and refreshes.  So here we are, at Ocean Shores for the week, having left the cats and the house in good hands.  The view from our 3rd floor balcony is the golf course in the foreground with hotels and the ocean in the background.  So even when it's windy and rainy, which it has been pretty much since we got here Friday, we have an interesting view and opening the door slightly gives me all the sea air I could want. 


View of storm coming in on Friday
 Saturday we ventured down to the shore in the car during a break in the rain.  There are no islands off shore as there are off the coast of Bellingham.  The next land out there is Japan, I believe.  So there's a lovely vastness that I find both soothing and invigorating.  Tensions evaporate.

Sunbreak during the shore visit
Alas we only got a few minutes of sunniness.  We were not the only ones at the shore, and others were braver than we and went out into the windiness to walk along the beach.  I got out to take the above picture and had to chase down my birding cap as the wind was strong enough to rip it off my head and send it scudding along the sand.

gulls huddling on the windy beach

So I quickly got back in the car and we cracked the leeward window so I could smell the ocean.  Watching the gulls is always fun and we enjoyed seeing them deal with the wind as they moved about the beach when cars came by.

Sunday was less rainy so we got to watch mallards, geese and a ginormous quantity of gulls on the golf course.  They were playing in the myriad puddles but all took off when a coyote came wandering along.  It took us  long enough to identify it as a coyote rather than a dog, or even a deer which are plentiful in the neighborhood, that I failed to grab my camera in time to catch it.  We have days yet so I have hopes he'll wander by again.

geese grazing
And last but not least in the amusing photos so far is this sign glued to the sliding glass door. 


So glad this is here because being mugged by gulls every time we opened the door would not add to our enjoyment.


Wednesday, October 9, 2019

Testing new mandala stencils

This last week got thoroughly eaten by the garage sale which went fairly well, with a steady stream of customers, altho I wish more stuff had gone away.  *sigh*

So I'm taking it a little easy and spent time yesterday trying out some new mandala stencils.  I'm not happy with the motif in the upper left of this dancer piece and I'm searching for a replacement. To be honest, I'm not happy with several things, but the incoming energy ball is my starting point.


These mandalas came in a set of 35 stencils and are 5x5inches.  I do my tryouts in black ink on white paper so I can scan in the ones I like and do whatever sizes I need for the current work.


Since things look different once they're on paper, I did 5 of the ones I'm most likely to use.  If not for this project, for creating fabric I like for other projects.  Of these 5 possibilities, I like #11 the best.


I particularly like the broken line giving a circle in the middle of the spinning spiral.  There's lots of movement, but also the calm center.  I love the overall effect.  Next up, doing it in colors to see what happens to all that motion.


Saturday, October 5, 2019

Studio downsizing sale ate my week

Today is my studio downsizing garage sale and it has taken the whole week to finish the decluttering, set up the garage, display all the items and price everything.  But once I finish today, My studio will be so fabulous to work in.  No moving stuff so I have a work space.  No opening bunches of drawers looking for that one thing I know I had somewhere.  Okay, that last one is probably over reaching somewhat but the problem should be easier.  I even have empty drawers now!


Besides decluttering my studio, I'm hoping to meet some neighbors and online friends.  And I'll be really happy if the rain stays away.

Hoping your Saturday is as happy making.


Sunday, September 29, 2019

resin success and the adventure continues

Despite a bout of the flu this last week, I still got several hours of studio time in.  And I managed to get a bubble free resin layer on top of a print that went all the way to the edges.  Third try is the charm apparently.


Spiral Dance #1 on a 6x6 painted wooden panel looks pretty good with the resin topcoat.  It's hard to see the resin because it's so clear and shiny but that's what is causing the reflections on the surface.

What helped me get this lovely bubble free coating is my new LED headlamp with optional magnifying lenses.  The light is tightly focused in front as these are meant for close work and they perform beautifully. 

MagniPros

In addition to doing the print, I tried some experiments in using small mandalas on scrabble tiles and attempted a couple of five pointed stars.  The big red one is a 3d printed outline that my son printed for me and the little yellow muffin silicone was used for the smaller star.


The mandalas came out perfectly, nice and domed on top of the transparency.  But the 3d printed mold didn't work as the resin leaked all over and basically turned the whole thing into a winter holiday ornament.  Maybe I'll paint it gold...  The muffin mold worked, altho it needs a little trimming around the edges, but I don't really like the raised outline.  So, more work in my future getting the star pendant I want.

Still doing pretty well on trying things out with the resin and next up is making a silicone mold of a 3d printed five pointed star and marbling using the non-liquid coloring things I have.


Thursday, September 12, 2019

healing from CFS progress report

I am very happy that I can report my energy level is increasing significantly.  I continue to improve as I implement the supplement regime given in Dr. Myhill's book (covered in the last CFS post) and this post is intended to give some detail about what I've done and what I plan to do next.

My miracle energy boost

Here's a timeline of what I've done so far.

5/11  Started D-ribose in 850 mg capsules because of a research link given in the CFS FB group.  The article recommended both D-Ribose (at 5-6g/day) and one of a list of adaptogens.  I've had problems with the adaptogens so I just started the D-Ribose with some improvement in energy but not enough to make me happy.

5/16 Started Ancestral Supplements beef organs.  I had problems taking the 6 a day they recommend so I did 3.  After a few days, I noticed my nails were stronger.  (My nails have always split easily so this was a noticeable improvement.)  Within a couple of weeks, I noticed my hair & nails were both growing much faster and seemed stronger.  There were also some surrealistic dreams which is related to this supplement being a natural antidepressant according to a friend of mine who deals with depression meds regularly.

 I bought Dr. Myhill's book on July 4.  I switch back and forth between the book and her webpage/wiki because the book is organized and the wiki not so much.  This got me taking All One vitamin & mineral supplement again.  It's in a powder form which I find appealing because I already take a large number of pills a day, mostly supplements of various types.  I ordered it via Amazon because our local food coop doesn't carry it and all the ones they do carry have foods in them that I am allergic to.  *sigh*  I also ordered powdered D-Ribose (see picture above) so I could up my dosage to 10-15g a day.

7/13  Started bigger dose of D-Ribose so switched to powder form.  Ordered a different, less expensive brand of ribose.
7/14  Started the All One rice base vitamins.  Libido woke with a roar!  Which made Jeff very happy.

7/14 - 31 Added other supplements given in Dr. Myhill's book.  Here's the list of things she thinks everyone should take plus a smaller list for CFS sufferers.  Still sort of simmering along and switched brands of ribose after finishing the first batch.


August:  At this point, I can do something every day but still wear out by dinnertime.  This is a big improvement over doing something every other day which is where I was in July.  I spent the month reading and doing small things, giving myself time to heal.

9/3 Finished the alternate brand of d-ribose and started the Dr's Best again.  Wow, what a rush!  Within 2 days, I was surging with energy, able to do 3-4 hours of studio work per day instead of 1-2.  And going out without being exhausted.  All on a lower dose of ribose so I'm sticking with this brand from now on.  Other effects I'm noticing include total absence of carb cravings and lower blood sugar readings in the morning.  I've also had enough energy to go on a couple of short birding trips.

Today:  While I'd like to be an energizer bunny again, I could live happily at this level.  I'm working in the studio 3-4 hours a day easily and waking energetic and early every day.  I still need to take breaks and put my feet up a couple of times a day but that's tolerable.  And I still run out of energy after dinner, especially on days when I'm up before 5am.  How do those morning people do this?

After a couple of weeks of the higher energy level, I'm feeling confident that I can maintain this.  At this point, it's time to add in the rest of Myhill's supplements, specifically the iodine, and increase my gentle exercise.  In 4-6 weeks, I'll post about how those things work out.

Saturday, September 7, 2019

Resin play or learning to fail better

I started  using resin to finish prints of my fabric pieces because it gives a nice shiny finish without the cost and fuss of matting and framing.  But once I had the resin, I started thinking of other things I could do with it.  And ways to do really teeny little prints.  Like in a pendant.  So my resin adventure is moving along and here's the latest attempt at both prints and jewelry.


The prints had some minor problems but both are fixable with some small effort and I learned some important things about brushing resin and being sure the surface is level when pouring it.  So failing better than I did with the first piece which was a non fixable failure.  I'll have to do some rough sanding and pour another layer of resin but I expect both of these will be good enough to sell.


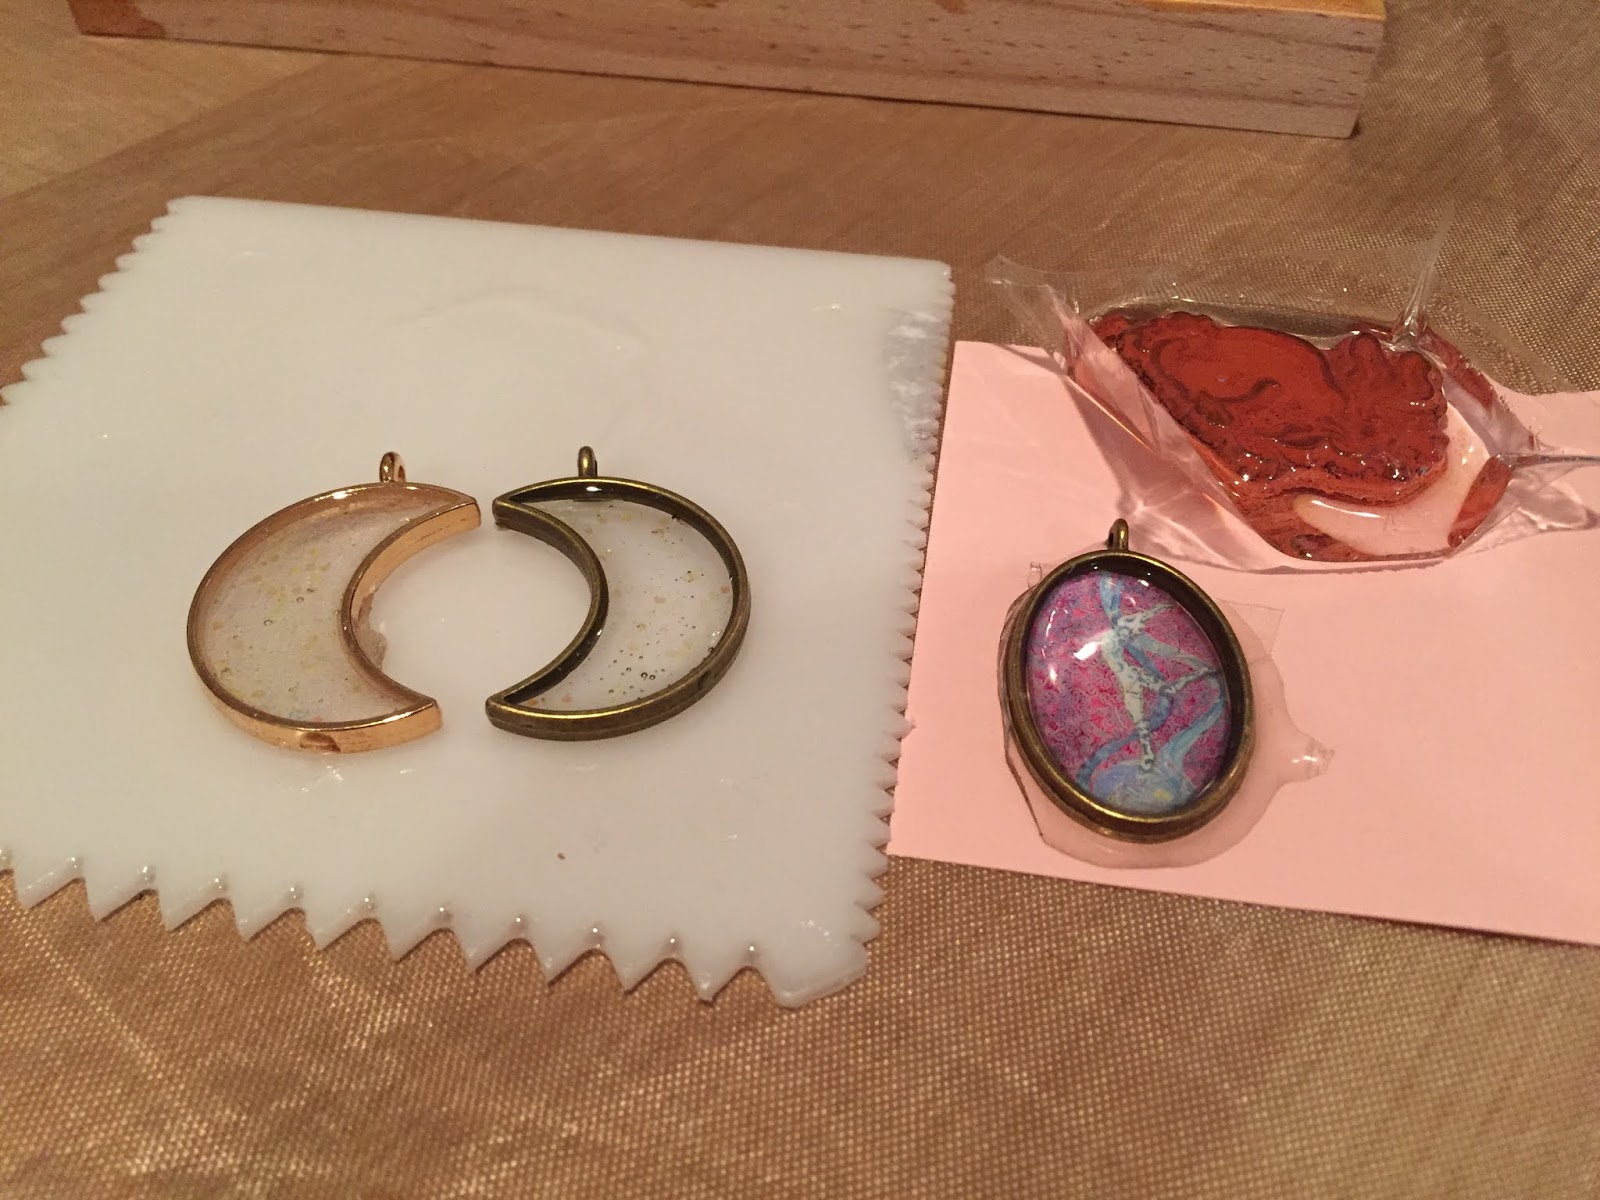
I learned some other things about doing the jewelry.  The moon pendants (altho they look like a pair of earrings when they're next to each other like that, don't they?) had some very minor things to be finished with some sandpaper so I consider them successes at this point.  The pendant with the print was an epic fail as the resin leaked out all over the place even though I used the same tape on the back as I did the moon on the left.  I did the top of the tape below the loop at the top, however, and this was apparently a fatal error.  And the attempt to use one of the stamps I don't use was also an epic fail.  So, on the small pieces, 50% fail rate.  I'm sure that will improve quickly with practice which is what I'll be doing this week.

One of the best things I did this week was find the Resin Obsession website.  The blog posts are just full of tutorials and ideas which is where the stamp idea came from.  I'll be trying out a couple of ideas this next week using transparencies and mixing in colors.  Fun times ahead!

Side note, I did 12 hours in my studio this week which is the first time I've gone over 10 hours since the CFS hit.  I think the combo of the supplements and the new work space is working well for me and I look forward to feeling productive again. 

Saturday, August 31, 2019

Modern Quilt exhibit at Whatcom museum

Jeff and I finally made it to the Modern Quilt exhibit, just a couple of days before it closed.  So, since I didn't blog about it in time for others to go, I took lots of pictures so I could do an in-depth review.  I found it a fascinating exhibit and an interesting example of the art quilt world having its first major schism of a new school.  Makes me feel like we're real artists, doing split offs over small differences and everything.


The above sign was an interesting attempt, at least to me, to define the differences.  Of course, not all the quilts in the exhibit were bed quilts and thus not "functional" as the quilt world defines it thus lending support to my idea that this is an art schism in action.  Lest anyone think I disapprove of or dislike Modern Quilting, let me just say this was an exciting exhibit and if I were still making quilts, I'd be looking to the local guild for some community as I have yet to find a local art quilt group.  I use a lot of negative space, and my work is often described as graphic in sensibility.  And I think any of these quilts would fit in fine at an art quilt show.   But on to the actual quilts.

The exhibit started in the hallway leading to the exhibit hall so I got an early exposure to the quilts without benefit of signs explaining the guiding concepts.  This was good as Jeff and I got to discuss the differences from the quilts we usually see at art quilt shows and draw our own conclusions.  Jeff's father was an art professor so he has spent his life hearing artists talk about design and I've been going to quilt shows with him since the mid 90's so he is a very good discussion partner at this point.

The first quilt we saw was the most traditional quilt in the show, imho.  And that's Jeff standing in front of it.  Traditional blocks altho not a traditional setting and not bed size either.   As we progressed down the hall to the exhibition rooms, we saw many more interesting and clearly non traditional quilts.


My favorite of the ones in the hall still uses blocks but not in a traditional symmetrical way.  Lots of negative space and a lovely use of color are the things that caught my eye.  Again, not a bed quilt.

Jellyfish by Debbie Jones
Jeff preferred the more graphical and monochromatic piece that came next. A very nice wall piece and I also enjoyed the use of color in it.

Arctic Ice by Susan Oberwortmann

After a few more quilts in the hallway, we got to the exhibition rooms.  There were so many wonderful quilts that I'm going to limit myself to those that particularly appealed to me and demonstrated the differences of the Modern Quilt  approach.  These will tend to look a lot like art quilts with a geometric theme which makes me think of artists like Lisa Call, for example.


Modern Stepping Stones
by Heather Black, Spokane

The one below caught my eye because of the colors and the interesting use of circles.  I'm fond of circles myself and tend toward this blue in my personal work.  I also have a tendency toward diagonal movement in my work so this piece struck my eye.


Jeff picked out the next piece which we first saw from the back.  Here's the label which is on the lower left corner and we both got a good laugh from the line about entropy.  This view also gives a good closeup on the dense quilting which was quite striking.


Here's the overall quilting as seen on the back. 


And finally, the front. 

Bloberella
by Hillary Goodwin & Christa Withers

Here are the rest of the quilts I found notable.  This one had very interesting quilting with changes in the thickness of the threads used to accentuate the curves.

Smoke
by Kat Jones, Australia
Jungle Abstractions:  The Lion
by Violet Craft, Beaverton

And the last part of the exhibit was variations on a traditional block.  The explanation of the exhibit with credits is above, and the shot below is the art itself.  This particularly caught my eye as the annual benefit auction for SAQA (Studio Art Quilt Assoc.) is 12x12 art quilts and this collection of variations reminded me of the auction webpages.


An excellent and interesting exhibit and I am very glad we got to see it.


Tuesday, August 13, 2019

New sitting area for creating with CFS

A few years ago, I redid my studio so I was standing while working to accommodate my back issues.  Now, I can't stand for more than 20 minutes due to the CFS problems.  So, I needed a new work area that was seated and while I was it, in the house with the heating & AC so that I wasn't freezing or sweltering during certain times of the year.   This is what I set up along the wall in the master bedroom which is very spacious as the builder was way over 6 feet tall and probably wanted room for a king size bed.


This gives me a desk for art and writing, and I'm going to move a small table for my sewing machine where the cardboard boxes are to the right of the desk.  The bookcases in the corner hold my relevant books and the art resin supplies.  and as you can see below, the boxes for unfinished projects (sewing).


Here's the desk area with the current sewing projects added along with the reference sewing materials.  The boxes on the desk are my new cpap which has yet to be assembled and the ball chair that I will be using in an attempt to not hurt my back by sitting more (left and right respectively).  I look forward to starting a project in here this afternoon and will report on how it goes soon.

Thursday, July 18, 2019

Chronic Fatigue Syndrome documentary & help

I have mentioned in passing that I'm dealing with Chronic Fatigue Syndrome.  In the last few weeks, I've had some major improvements and this has been so good for me that I want to share.

It all started with a friend recommending a documentary available on Prime.  "What about ME?"  ME stands for Myalgic Encephalitis which is one of the many names for whatever the heck is going on.  My husband has some valid criticisms of the documentary as a narrative but I highly recommend it for anyone suffering from CFS and anyone who cares about them.  One of the worst aspects of CFS is how isolating it can be because going out and socializing becomes exhausting.  So it gave me hope to see how widespread this problem is and that there is at least one doctor who has been treating it successfully for decades.

Which leads to Dr Sarah Myhill and her book, pictured below.


I have just started reading the book and the first thing that impressed me is her instruction to CFS patients to skip the theory in the first half and go straight to the things to do if reading the theory is difficult due to CFS brain fog.  So I did that.  And I am impressed with how much improvement I've seen in just a few weeks.

What part of her protocol am I doing?  I've upped my d-Ribose from 5g a day to 10-15g.  And increased my B12 to 5g.  This has not only brought about a noticeable increase in my energy but is stabilizing my insulin production enough that my various skin tags have shriveled up and fallen off.  They aren't supposed to do that on their own so this seems significant to me.

For those who don't want to buy the book, I can recommend checking out her webpage.  Here's a link to her section on supplements to take daily even for those not suffering from CFS.

I'll be working my way through the book over the next month or so, and will update my progress.  Because there really are a lot of doctors who believe CFS is all psychological and I know how hard that can be.

Sunday, June 16, 2019

Summertime joy: birds & roses

Yesterday was spent with a friend, celebrating her birthday by looking for birds and flowers.  Bright sunny day, warm weather, time at the ocean with a friend of more than 35 years.  Life doesn't get much better than that.


Unfortunately, we had misread the tide tables and went to Semiahmoo Spit at low tide rather than high.  Not many birds at all but a day with time to watch the water sparkle and smell the sea air is a good day.

We then decided to go check out the heronry in Fairhaven with a stop at the always fabulous Colophon Cafe for lunch first.  The herons are active, apparently trying to teach the babies to flap their wings.  The young are still fluff balls so it will likely be a bit longer before the kiddies try to fly down to the water on the other side of the walking trail.  We did find several small birds along the train, including the singing Bewick's Wren above.  This was a new bird for Mischa and the First of the Year sighting for me so that was nice.

We ended the day visiting the rose garden at the corner of Cornwall & Illinois.  The roses are all in bloom and we took some nice pics of some of the most glorious.


Mischa was looking for a multi-colored rose similar to Tropicana and this was a nice grandiflora showing some of the same color blending.  This is also on my list of roses to put in the front yard when I get to redoing the yard.

I hope you all also have a glorious summer weekend.  After all the walking yesterday, I'm spending today reading and enjoying our airconditioning. 

Tuesday, May 28, 2019

An interesting ebike review

I'm still struggling with the medical issues so here's something else interesting in my reading recently.  An ebike review of a Dutch bicycle that automatically supplements your pedaling to make it easier to bike around town.  I admit, I've generally been dubious about handing over control of the motor to the bike but this review will probably get me to try out this type of bike.  In general, we're going smaller and electric with vehicles at our house so this is in line with that trend.  Now if there were only some rain shield accessory.  The review comes from treehugger (gotta love the name) and is about the Gazelle Medeo.  Check it out here.


Tuesday, May 21, 2019

Summer reading or what I've been doing since cataract surgeries


I've had a miserable series of medical issues since late March (sinus infection, shoulder injury and 2 cataract surgeries) and I am mostly all better now, but pretty much all I've done in the last few weeks is read.  So here's what I've been reading.

While treating the ear/sinus infection,  I started reading the Alex Craft series by Kalayna Price.    Executive summary:  good urban fantasy series, mashup of PI and traditional fae universe with a bit of zombie/ghost action too.  I'm not a big fan of vampire books so this one was nice since it has a completely different focus.  Somewhat similar to Seanan McGuire's October Daye books since there's crime solving going on in a universe with fae.


Barnes & Noble notified me of a new Incryptid novel, so of course I re-read that series.  Funny and enjoyable altho a bit dark since the family is fighting a losing battle against the Covenant of St. George .  While there are sorta vampiric creatures in this universe, it's mostly an exploration of a wide variety of creatures living in the various nooks & crannies of our world without being a serious threat to humans.  The conflict comes between the Covenant (which believes the only good cryptid is a dead cryptid) and the Price family, who believe that if a cryptid isn't actually endangering humans, then there's no problem.  The Prices also want to study the myriad cryptids that exist and document what they discover.  Since it's a Seanan McGuire series, there's some great humor with the mice who worship the Prices and some darkness as the various events unfold.


And last, but certainly not least, I've discovered the Lucas Davenport series.  Thirty books about a cop in Minnesota who has a certain flexible morality and a whole lotta luck.  Since they're thrillers, it's pretty much serial killers all the time in an almost noir-ish sensibility.  The author worked as a crime reporter so there's some good writing, an interesting main character, and a whole array of supporting characters.  I'm about halfway through the series and still enjoying it which doesn't always happen in a long series when I read them in a lump.    No picture for this series, since the titles all have Prey in them and there's no art on the covers.

Now I'm mostly recovered and starting summer birding along with more studio time so I should return to birds or art for next time.


Wednesday, May 8, 2019

The beauty of ordinary birds

I went to Scudder Pond yesterday, hoping to see some swallows, maybe a warbler or two.  Alas, my hopes were dashed yet I had a wonderful day because I got some closeup looks at some of the common birds.  First up, some Canada Geese were in the pond.  Normally, they are in the larger, deeper pond down the hill but this time, they were right there.  And not at all shy about having their photos taken.


I kept getting interrupted by the extremely active and numerous redwing blackbirds.  There were at least 6 squabbling over who got the best perches to sing from.  Alas, it seems my autofocus on the camera has a really hard time seeing a small black bird as the focal point rather than a shadow.  That combined with their inability to sit still meant I got lots of shots of a black blur atop a cattail.

Sparrows were fearless.  One has apparently been fed often enough that he kept hopping closer to me to see if I had some seed.  Once I pulled out the camera, he flew off, of course.

But the big surprise was a bird perched high atop a branch but not singing, just keeping an eye out.  The sun was bright enough and he was far enough away, that my eye was fooled into thinking it was a junco.  (Smallish bird with a black hood, brown body.)  It wasn't until I was processing the photos earlier this morning that I realized I had some quality shots of a towhee, one of my favorite common birds. 


Here's to the beautiful birds, common and rare, and to celebrating spring.


Saturday, April 27, 2019

Post Point Heronry or where the birds are

April is when the herons start building their nests here in Bellingham and it was a challenge for me this year to get out there for photos before the trees got all their leaves growing in the way.  But we did a couple of days, one with good lighting, so here's some heron photos. 

I'll start with the best shot I got.  This heron was doing some morning preening so getting a good shot of the head in between the leaves was a challenge.


And to truly see how the leaves can get in the way, here's the action shot  spoiled by the leaves.


Post Point has more birds than the herons, of course.  There's a nice cove where the ducks and a killdeer hang out and an adjacent dog park with lots of shrubs for the smaller birds.  Alas, I neglected to snap a shot of the oystercatchers who have moved in but I did get this good shot of the bufflehead.  I've never been close enough to see the green on the back of the head before so that was a nice new experience.


I also got my first warbler of the season on the walk back to the car.  No photo, alas, but all in all, a very lovely birding expedition right in the middle of Bellingham.

Wednesday, March 27, 2019

Grounded in Springtime initial composition finally done

I've been reworking how I work in my studio to accommodate my Chronic Fatigue Syndrome and the damage to my left eye's retina over the last few months and I finally got my new dancer piece to the stage where I can share a picture.  Yippee!

This is a big milestone which also marks several accomplishments in creating a new workflow and learning new tools.  And I'm sure I'll talk more about that later but for now, I'm just going to enjoy the visuals.  Here's the foreground composition.


This is a new thing for me, doing a piece on a plain white background.  Because when I was an art quilter, I'd piece the background first and then create the foreground on top of it.  Now, I'm doing it on white paper with the intent to try out various backgrounds in Photoshop before I glue everything down and finish the final piece.    This will not be the final dancer as I'm not liking the blue spirals on the yellow body.  I think they should be green for that whole green spring effect I'm aiming for.  This also means the spiral galaxy on the right needs to be lighter so there's more tonal contrast with the dancer.  And I'm going to do some variations along these lines along with using marbled fabric for that circle on the right. 

Here's some of the background fabrics I'm thinking of using.  It will be interesting to see how they work with the final foreground I develop over the next week.

Spiral galaxies

My theme for the dancer series work is "Dancing Through Space & Time" so I'm using astronomical images in a variety of ways.  I'm looking forward to playing with this one as a background, maybe with some color shifting.  

starry night sendoff

This one has lots of color and will give me a less structured background while still having the feel I'd like to achieve.  Also color shifting in the future for this one too altho it's likely to go a different direction.

More pictures will be shared as I finally get some new stuff produced. 


Saturday, March 23, 2019

Female fiber artist who influenced me: Robbi Eklow

It's March again and that means women's history month.  I'm solidly in the fiber art field now, growing from the art quilt field, so I'm focusing on artists who have influenced me.  This year, I'm picking Robbi Eklow, in part because I'm starting my own Bellingham School of Digital Collage (with a nod of acknowledgement to the Chicago School of Fusing) and in part because she's been posting on FB about her latest major life transition and I can definitely relate to that magnitude of change.

So, who is Robbi?  Her webpage gives this succinct bio.  "Robbi Joy Eklow has an Engineering degree from Purdue University in West Lafayette, Indiana. In college she married her husband Brian, they have two children. Robbi lectures and teaches internationally, and has shown quilts and won ribbons in major quilt shows across the United States. She wrote a bi-monthly column "Goddess of the Last Minute" for Quilting Arts Magazine. She has designed quilts and written articles for many quilting publications and written two books about quilting."  See her quilt gallery here.

Her column in Quilting Arts magazine helped me free myself from all the rules of the quilt police.   The quilting shows originally started out of state fairs and the judging of quilts was primarily based on technique and how well that technique stuck to the traditions of the field.  Robbi's writing was a wonderful breath of humor and she introduced me to the concept of fusibles.  Since I now do collage rather than piecing, it's clear that fusibles opened a doorway for me to a brand new world.


On of her earlier quilts showed how to use the fusing with hand dyed fabric with her signature repetition of shape within the quilt (The picture above is a newer version of that).  I was still doing traditional pieced quilts when her work (among others) inspired me to step outside traditional patterns, cut those shapes however I wanted and fuse away.  I'm still doing that now, a couple of decades later, but mixing in paper and paint too. 


Monday, March 18, 2019

resin experiment #2

Despite a horrible sinus/ear infection, I got some resin testing done this week.  I made up a board with different fabrics and used 3 different sprays I had on hand to see if any of them worked to block the darkening that happened with the first trial.  Here's the before fabric board.


I have a UV protective spray, a non VOC fixative (milk based), and fabric stiffening spray.  I left one column with no protection so I could see the difference.  I also glued the fabric down thoroughly using the purple Elmer's acid free glue sticks.    Then I used packing tape around the edges to stop the dripping that happened with the first board use.

Here's the results with some of the original fabric next to the board to show the darkening that happened.


The sprays don't seem to have made any difference but the darkening only happened with the darker fabrics.  I'm not sure what caused this completely different result altho I suspect just the glue itself helped lessen the darkening since I was very thorough about gluing the fabric down.  The lighter and medium fabrics didn't darken much if any so I'm going to work with a lighter palette for now and do some further experimentation.  

The bonus I got from this experiment is I discovered the fabric stiffening spray is reported as being very effective for use with the Scan N Cut.  I'll be testing that out myself later this week.  And I learned how to use my little torch to get rid of bubbles in the resin. Oh, and the packing tape was an epic fail.  It contained the dripping to one big spot but bulged out so it was still off the board.   All in all, a good bit of progress in understanding my new material.

Tuesday, March 12, 2019

New birding board game has me so excited!!!!!!!

I'm on a couple of FB birding lists and I got completely inundated with news about a new board game, Wingspan.  It also got covered by the NYT so no surprise to find out it's already out of stock.  I'm signed up to get notified when they get more printed since there's no way I'm paying triple the price to buy one right now.    But isn't this just the coolest birdy thing ever?


The pic is from the publisher's website as is this description of the game. 

"You are bird enthusiasts—researchers, bird watchers, ornithologists, and collectors—seeking to discover and attract the best birds to your network of wildlife preserves. Each bird extends a chain of powerful combinations in one of your habitats (actions). These habitats focus on several key aspects of growth:

Gain food tokens via custom dice in a birdfeeder dice tower
Lay eggs using egg miniatures in a variety of colors
Draw from hundreds of unique bird cards and play them
The winner is the player with the most points after 4 rounds.

If you enjoy Terraforming Mars and Gizmos, we think this game will take flight at your table."

Besides my natural excitement at something that is so forthrightly birdy, the reviews are good on the game & the mechanics so I'm really looking forward to this.  I know what I'm getting myself for an early birthday present!

Wednesday, March 6, 2019

Resin experiments begin

As I continue my studio experimentation, I turned to resin for sealing prints and as a possible top coat for fabric collage.  I also have seen some interesting marbling done with resin so that was also on my list.  So, I created 3 pieces to try out with a resin top:  a small dancer collage that I had in my to be finished up drawer, a piece with a photo of Audubon's Great Blue Heron with some various tested fabrics, and a board covered with gold ground that I would marble on.  Various searches on the internet told me that fabric may or may not darken when resin is poured on top and one way to test is to dip the fabric in water.  If it doesn't darken, the resin shouldn't darken it either.  So I tested a variety of green fabrics and put scraps of them on the piece with the photo.

The results were informative.  All of the fabric darkened.  I suspect this is because I prewash my fabrics so I removed the sizing that is on them when they are bought.  Clearly, first thing to test in the next batch of tests is whether a sealant on the fabric will keep them from darkening.  Here's the fabric collage piece, 6" square, and it's almost impossible to see the color of the L shaped cloud piece the dancer is on.


Unfortunately, I didn't take a photo of the entire piece before putting the resin on but I do have photos of the background fabric and the dancer element separately so you can see how much darkening has occurred.

As is obvious, the background fabric is seriously darker and greener which totally ruins the look of the piece.  And then there's the dancer element which loses all the subtle color variations.  Totally unhappy artist with this piece.


The heron photo with the green fabric scraps did somewhat better.  The photo and the marbled fabric along the bottom retained their colors and clarity.  So big win on using the resin for photos and a more work required result for the marbled fabric.  It's not obvious in the photo but the fabric scraps and the marbled fabric on this one floated up a bit in the resin and some stick out the top.  This can be dealt with by better glueing them down to begin with or by putting a second coat of resin on top.


        The green fabric scraps scattered around all passed the water test but darkened considerably so definitely a sealant test on fabric in my future.

And then the most successful of the 3 initial tests:  marbling on a board.  The colors worked well, the resin lost a tiny bit of marbling detail over time and except for the massive dripping off the bottom right corner, things were generally better than I expected.  I'll be doing much more of this type of thing in the future along with a couple of tests of taping the edges to stop the dripping off the sides.


I'm looking forward to working with the resin and I am absolutely happy with it as an alternative to acrylics for a topcoat on prints.  We'll see with the next round of experiments how many other places I can use it in my studio.